Pages

Monday, March 21, 2011

SQL Server Compact Toolbox 2.1–Visual Guide of new features

Celebrating more that 20.000 downloads, version 2.1 of my SQL Server Compact Toolbox extension for Visual Studio 2010 is now available for download. This blog post is a visual guide to the new features included in this release, many suggested by users of the tool via the CodePlex issue tracker.

Generate an Entity Data Model (EDMX) in the current project in any applicable project (WPF, WinForms, Class Library)


As you may know, the tooling support for 4.0 is somewhat limited, and therefore you have to use various workarounds to generate an EDMX for a version 4.0 database in projects that are not Web based. Version 2.1 of my Toolbox adds the ability to run edmgen2 via a friendly dialog to generate and include an EDMX file in any applicable project type.

image

image

(I will blog later about how I did this, using the edmgen2 project)

Remove invalid connection definitions from the Toolbox (and Server Explorer)

As you move SQL Server Compact files around and upgrade version 3.5 files to version 4.0, many of the connection entries in Server Explorer / the Toolbox become invalid. Therefore, I have added a menu option to remove broken connections.

image

Option to display binary data in result

image

Preventing invalid values in Max Database Size textbox

By using the NumericUpDown control from the Extended WPF Toolkit, it is no longer possible to enter invalid max database size values.

image

For a similar overview of version 2.0 features, see this blog post.

Updated release of standalone version.

The standalone version for users not running Visual Studio 2010 Pro or higher, is also available in a new release, the main feature being, that it is now a single .exe, with only .NET 4.0 and SQL Server Compact 4.0 RTW required to be present on the system.

As always, please provide feedback, suggestions and reviews at the CodePlex site: http://sqlcetoolbox.codeplex.com

READ MORE - SQL Server Compact Toolbox 2.1–Visual Guide of new features

Thursday, March 10, 2011

Visual Studio 2010 Service Pack 1 with support for SQL Server Compact 4.0 released

Visual Studio 2010 SP1 is now available to MSDN subscribers, and includes support for managing SQL Server Compact 4.0 databases in Server Explorer. Notice that you must download the SQL Server Compact tools in order to enable the new provider via Web Platform installer, as I blogged about earlier.

UPDATE: The SQL Server Compact team has posted a blog about the new tools support in SP1, including
- Server Explorer and Query Designer
- Transact-SQL Editor (for VS Premium and higher users)
- Designers in the VB and C# ASP.NET Web application or web site projects
- Click once deployment

Interesting tidbits from the readme:

2.1.4. Visual Studio must be restarted after Visual Studio 2010 SP1 tooling for SQL Server Compact (Compact) 4.0 is installed

When a project that contains a Compact 4.0 .sdf file is opened and neither Compact nor Visual Studio Tools for SQL Server Compact 4.0 (Tools for Compact) is installed, Visual Studio 2010 SP1 asks whether the user wants to install the missing component. If the user says "yes," Web Platform Installer downloads and installs either Compact or Tools for Compact.  However, if the user then tries to open the .sdf file, an "unknown error" occurs because Tools for Compact 3.5 is already loaded and it cannot be unloaded and replaced by Tools for Compact 4.0 until Visual Studio is restarted.

To resolve this issue:

Restart Visual Studio after you install the SQL Server Compact 4.0 tooling.

And from the KB article:

SQL Server CE 4 support

Visual Studio 2010 SP1 enables you to manage Microsoft SQL Server Compact 4.0 SDF files in Solution Explorer and in Server Explorer in the context of web projects. Additionally, Visual Studio 2010 SP1 enables you to use SQL Server Compact 4.0 together with the Microsoft ASP.NET Web Forms in a SQL data source control.
Note SQL Server Compact 4.0 is not included in Visual Studio 2010 SP1, and you must download it separately. For more information, visit the following blog:

VS 2010 SP1 and SQL CE (http://weblogs.asp.net/scottgu/archive/2011/01/11/vs-2010-sp1-and-sql-ce.aspx)

Web PI integration

Support for the Microsoft Web Platform Installer (PI) is added in Visual Studio 2010 SP1 as follows:
  • A new toolbar is added that allows for quick access to start the latest version of Web PI. Additionally, if the Web PI was not installed, it is downloaded first.
  • When you open web projects that use IIS 7.5 Express, SQL Server Compact 4.0, or ASP.NET Razor syntax, a dialog box appears that offers to download and install these components by using Web PI if the components are not already installed.

Deployable dependencies

Some new technology components that are added in Visual Studio 2010 SP1 can be bin-deployed together with an application. Then, you can use the components even when you deploy the application to a server on which those components are not installed. A new dialog box is added in Visual Studio 2010 SP1 that makes it easier to add these deployable dependencies to the web project. To access the dialog box, right-click the project in Solution Explorer, and then select Add Deployable Dependencies. The following components are supported:
  • ASP.NET Web Pages that use Razor Syntax
  • SQL Server Compact 4.0
  • ASP.NET MVC 3
For more information, visit the following blogs:

BIN Deploying ASP.NET MVC 3 with Razor to a Windows Server without MVC installed (http://www.hanselman.com/blog/BINDeployingASPNETMVC3WithRazorToAWindowsServerWithoutMVCInstalled.aspx)
How to Bin Deploy SQL Compact Edition 4.0 and Razor web projects (http://blogs.msdn.com/b/webdevtools/archive/2011/01/06/how-to-bin-deploy-sql-compact-edition-4-0-and-razor-web-projects.aspx)

        READ MORE - Visual Studio 2010 Service Pack 1 with support for SQL Server Compact 4.0 released

        Monday, March 7, 2011

        Migrate a SQL Server Compact database to SQL Server using Web Deploy (MSdeploy)

        You can use the latest version of the msdeploy command line utility, which is included with WebMatrix, to migrate a SQL Server Compct database to SQL Server, or simply generate a script (in SQL Server T-SQL dialect) of the entire database, both schema and data.

        On my PC, the msdeply.exe version 2.0 is located at C:\Program Files (x86)\IIS\Microsoft Web Deploy V2

        Below are some sample usages involving a SQL Server Compact 4 source database:

        msdeploy -verb:sync
        -source:dbFullSql="Data Source=C:\data\sqlce\test\nw40.sdf",sqlCe=true 
        -dest:dbFullSql="c:\data\scriptnw.sql"

        This will create a script of the entire database in SQL Server T-SQL dialect, both with schema and data.

        msdeploy -verb:sync -source:dbFullSql="Data Source=C:\data\sqlce\test\nw40.sdf",sqlCe=true,scriptdata=False -dest:dbFullSql="c:\data\scriptnw.sql"

        This will create a script of the entire database in SQL Server T-SQL dialect, schema only.

        msdeploy -verb:sync -source:dbFullSql="Data Source=C:\data\sqlce\test\nw40.sdf",sqlCe=true,NoCollation=true,SchemaQualify=false -dest:dbFullSql="c:\data\scriptnw.sql"

        This will create a script of the entire database in SQL Server Compact compatible T-SQL dialect, both with schema and data.

        Unfortunately, the script generated on my machine contains the following statement, which is not valid T-SQL:

        INSERT INTO [Order Details]([Order ID],[Product ID],[Unit Price],[Quantity],[Discount]) VALUES (10001,25,9,8,30,0,15)

        7 values to 5 columns – it is a localization issue, that I have reported  here, it can be fixed by changing the decimal point in regional settings.

        You can read more about the supported scripting options here.

        You can read more about the dbFullSql provider and it’s support for SQL Server Compact 4.0 here.

        READ MORE - Migrate a SQL Server Compact database to SQL Server using Web Deploy (MSdeploy)

        Sunday, February 27, 2011

        Access SQL Server Compact 4 with ASP Classic and VbScript

        Now that you can use SQL Server Compact 4 with ASP.NET, some developers wonder if you can also use it with ASP Classic. To access with ASP Classic, the SQL Server Compact 4.0 OLEDB provider must be installed on the system, so the 4.0 MSI must be installed by an administrator – no private deployment.

        But YES, you can access a SQL Server Compact 4 database file from ASP Classic:

         image

        (The url is: http://localhost/aspclassic/default.asp)

        Of course the required read/write permissions must be given the the relevant process user to the folder where the database file is located.

        Here is the code to do it:


            Test SQL Compact 4 and ASP Classic + ADO

        <%

        set conn = Server.CreateObject("ADODB.Connection")

        strCnxn = "Provider=Microsoft.SQLSERVER.CE.OLEDB.4.0;" & _
            "Data Source=C:\inetpub\wwwroot\AspClassic\App_Data\nw40.sdf;"

        conn.Open strCnxn

        set rs = Server.CreateObject("ADODB.recordset")
        rs.Open "SELECT TABLE_NAME FROM INFORMATION_SCHEMA.TABLES", conn

        do until rs.EOF
            for each x in rs.Fields
               Response.Write(x.name)
               Response.Write(" = ")
               Response.Write(x.value & "
        ")
            next
            Response.Write("
        ")
            rs.MoveNext
        loop
        '
        rs.close
        conn.close
        %>


        READ MORE - Access SQL Server Compact 4 with ASP Classic and VbScript

        Monday, February 21, 2011

        Using SQL Server Compact 4.0 with Desktop Private Deployment and a Setup project (MSI) (part 2)

        I my previous post in this 2 part series, I demonstrated how to use SQL Server Compact 4 with Entity Framework 4 in a desktop application, despite the not excellent tools support.

        This time I will show how to implement private deployment, and also how to solve other challenges related to installing via a Windows Installer file (MSI), by adding a Visual Studio Setup project to the solution.

        First I will configure the project for Private Deployment, and then add a Setup project.For more information on requirements for Private Deployment, see my blog post SQL Server Compact “Private Deployment” on desktop–an overview.

        Enable Private Deployment in a project

        This includes copying the required SQL Server Compact 4.0 runtime files, and including these as content in the project, and modifying app.config to refer to the Private managed ADO.NET provider.

        Locate the files to be copied in C:\Program Files\Microsoft SQL Server Compact Edition\v4.0\Private.

        image

        Copy all files and folders here to the project folder (on my system C:\projects\Chinook\Chinook.WPF).

        Select “Show all files” in Solution Explorer in Visual Studio. Your project should now look similar to this:

        image

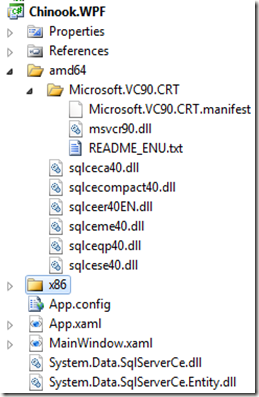
        Include the amd64 and x86 folder in project (right click), including all content and subfolder as Content, Copy Always. Also include the two managed DLL files in the project root (System.Data.SqlServerCe.dll and System.Data.SqlServerCe.Entity.dll). Make sure to specify “Copy Always”, or the files will not be included in the project output. Verify that all files are included by looking in the debug folder after building the project.

        You should now have a project structure like this (same set of files in the x86 folder, of course):
        image

        Now modify your app.config to refer to the Private ADO.NET provider, which has assembly version 4.0.0.1, not 4.0.0.0 as the on in the GAC. Using this special assembly version provider will prevent assembly probing from picking up a newer version of the provider in the GAC.

        <system.data>
        <
        DbProviderFactories>
        <
        remove invariant="System.Data.SqlServerCe.4.0"/>
        <
        add name="Microsoft SQL Server Compact Data Provider 4.0" invariant="System.Data.SqlServerCe.4.0" description=".NET Framework Data Provider for Microsoft SQL Server Compact" type="System.Data.SqlServerCe.SqlCeProviderFactory, System.Data.SqlServerCe, Version=4.0.0.1, Culture=neutral, PublicKeyToken=89845dcd8080cc91"/>
        DbProviderFactories>
        system.data>


        Notice the version on the type entry is 4.0.0.1.

        IMPORTANT: If you reference System.Data.SqlServerCe.dll, make sure to reference the 4.0.0.1 version in your project folder!


        Verify that the application still runs, and displays data.


        Add and configure a setup project to produce a MSI (Windows Installer) file


        (This is a little involved, as I will demonstrate solutions to several deployment issues here).


        Start by adding a Visual Studio Installer project to the solution, and call it Chinook.WPF.Setup


        image


        Create a setup for a Windows application, and add the Content Files and Primary Output from Chinook.WPF:


        image


        For this project, we want to include the Chinook40.sdf file and deploy it with our installer. Other options include creating the sdf file at the first application startup. So we add the Chinook40.sdf file as additional file:


        image


        Set the Permanent property on the Chinook40.sdf file to True, to prevent it from being removed during uninstall.


        image


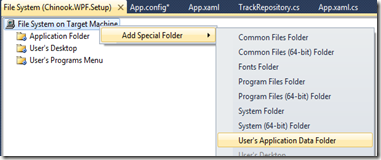
        In the file system browser in the Setup project, add the User’s application data folder, this is where we want the sdf file placed,as this is a writable location (Program Files folder is not writable):


        image


        Now we can set the folder location of the sdf file to this folder:


        image


        So the database file will now be installed in the C:\\Users\\\\AppData\\Roaming\\ folder. Now we need to modify the connection string. We can do this by manipulating the DataDirectory location, as this is part of the connection string. Add a Startup event handler to App.xaml:


        <Application x:Class="Chinook.WPF.App"
        xmlns="http://schemas.microsoft.com/winfx/2006/xaml/presentation"
        xmlns:x="http://schemas.microsoft.com/winfx/2006/xaml"
        StartupUri="MainWindow.xaml" Startup="Application_Startup">
        <
        Application.Resources>

        Application.Resources>
        Application>


        In this handler, add the following code, notice the comments (!):


        private void Application_Startup(object sender, StartupEventArgs e)
        {
        // This is our connection string: Data Source=|DataDirectory|\Chinook40.sdf
        // Set the data directory to the users %AppData% folder
        // So the Chinook40.sdf file must be placed in: C:\\Users\\\\AppData\\Roaming\\
        AppDomain.CurrentDomain.SetData("DataDirectory", Environment.GetFolderPath(Environment.SpecialFolder.ApplicationData));
        }


        Finally, add a shortcut to the application in the User’s Programs Menu file system folder:


        image


        Move the shortcut to the User’s Programs Menu folder, and rename to Chinook.


        image


        Now build the Setup project (right click and select Build), and test the installer on a system without SQL Server Compact 4.0 installed. .NET 4.0 Client Profile must be installed, however. The setup will not install if this is not the case.


        You can test on your development system, by uninstalling the desktop runtime:


        image


        Happy deployment!


        You can download the completed solution from here:


        READ MORE - Using SQL Server Compact 4.0 with Desktop Private Deployment and a Setup project (MSI) (part 2)

        Monday, February 7, 2011

        Using SQL Server Compact 4.0 with WPF DataGrid, Entity Framework 4 and Private deployment (part 1)

        In this and a following post, I will show, how you can use SQL Server Compact 4.0 with a desktop application, despite full tool support for this. Reasons for wanting to use SQL Server Compact 4 rather than 3.5 SP2 could be: Better support for Entity Framework 4, including support for Server Generated Keys and the Code First CTP, paging support and new ADO.NET APIs such as GetSchema and SqlCeConnectionStringBuilder. For an overview of SQL Server Compact 4, see this.

        I will also show how to include the SQL Server Compact DLL files for private deployment with a desktop application, including in a Visual Studio Setup project (in part 2).

        I will reuse the Data Access Layer based on Entity Framework 4 and POCO classes that I created in this blog post. Notice that there is no direct tooling to create a Entity Framework Model from database in the SQL Server Compact 4 tools for Visual Studio SP1, and therefore you must use one of the workarounds described. A third workaround is to install the VS 2010 SP1 SQL Compact Tools, create the 4.0 based model in a web project, and move this model to a Class library.

        Start by opening the Chinook solution, and add a new WPF Application, Chinook.WPF:

        image

        Add references to the 3 project that make up the Data Access Layer (Data, Model and Repository):

        image

        Add a WPF DataGrid to the MainWindow.xml file, so it looks like so:

        <Window x:Class="Chinook.WPF.MainWindow"
        xmlns="http://schemas.microsoft.com/winfx/2006/xaml/presentation"
        xmlns:x="http://schemas.microsoft.com/winfx/2006/xaml"
        Title="MainWindow" Height="350" Width="525">
        <
        Grid>
        <
        DataGrid AutoGenerateColumns="True" Margin="5,5,5,5" Name="dataGrid1" />
        Grid>
        Window>


        Notice that for this demo, I have set AutoGenerateColumns=True.


        Add an event handler for the Loaded event, and add this code to MainWindow.xaml.cs:


        var repo = new TrackRepository();
        dataGrid1.ItemsSource = repo.GetAll(null, 50, 0); ;


        Also add using Chinook.Repository; to the using statements.


        For this demo, let us assume that each user has her own database file. So where can we put the file – the users ApplicationData is a possibility.


        Now add an app.config file with the Entity Framework connection string:


        image


        xml version="1.0" encoding="utf-8" ?>
        <
        configuration>
        <
        connectionStrings>
        <
        add name="ChinookEntities" connectionString="metadata=res://*/ChinookModel.csdl|res://*/ChinookModel.ssdl|res://*/ChinookModel.msl;provider=System.Data.SqlServerCe.4.0;provider connection string="Data Source=|DataDirectory|\Chinook40.sdf"" providerName="System.Data.EntityClient" />
        connectionStrings>
        configuration>


        Notice that the SQL Server Compact connection string is:


        Data Source=|DataDirectory|\Chinook40.sdf


        So to make the application look for the database in the proper location, we can redefine the DataDirectory macro, by adding an event handler to App.xaml.cs like so:


        private void Application_Startup(object sender, StartupEventArgs e)
        {
        // This is our connection string: Data Source=|DataDirectory|\Chinook40.sdf
        // Set the data directory to the users %AppData% folder
        // So the Chinook40.sdf file must be placed in: C:\\Users\\\\AppData\\Roaming\\
        AppDomain.CurrentDomain.SetData("DataDirectory", Environment.GetFolderPath(Environment.SpecialFolder.ApplicationData));
        }


        Now place a copy of the Chinnok40.sdf file in the proper location (on my Windows 7 PC, it is C:\\Users\\ErikEJ\\AppData\\Roaming\\, set Chinook.WPF as the startup project and run the application:


        image


        To make the code run faster, you can add this line to the TrackRepository.GetAll method:


        context.ContextOptions.ProxyCreationEnabled = false;


        You now have implemented a WPF application using Entity Framework 4 using POCO and Database First with SQL Server Compact 4.0.


        In the next part I will show how to add the SQL Server Compact DLL files for private deployment, and create a MSI that installs these files and the database file, so the application can run on any machine with .NET 4.0 and a supported platform. (And .NET 4.0 being the only required component).

        Part 2- Entity Framework with SQL Server Compact 4.0 and ASP.NET – Dynamic Data, OData, deployment: http://erikej.blogspot.dk/2011/01/entity-framework-with-sql-server.html


        You can download the solution so far from here:


        READ MORE - Using SQL Server Compact 4.0 with WPF DataGrid, Entity Framework 4 and Private deployment (part 1)